JavaScript Online Test
20 questions total, 35 minutes maximum, for mid-level programmers
You can automatically assess the programming aptitude of prospective candidates using our JavaScript online test.
This quiz consists of 20 questions written and reviewed by a team of veteran JavaScript developers. It covers a wide spectrum of JavaScript language knowledge and provides an accurate snapshot of candidates' programming skills, allowing you to easily identify the most promising developers.
With our JavaScript test, finding the best candidates to interview is as easy as checking your email!
Programming test includes:
JavaScript - 20 Questions
- General JavaScript, Operators and Statements
- Functions and Scope, Passing by Reference vs. by Value
- JavaScript Objects, Arrays
- Using JavaScript in Browsers: DOM, Events, Security
Sample JS Test Question
Which of the following JavaScript snippets will create an alert box containing "Hello John Doe"?
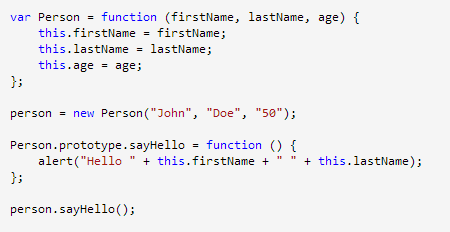


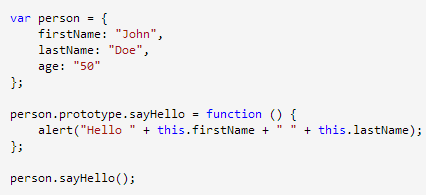
The correct answers are 1 and 3.
Sample JavaScript Test Report
This sample JavaScript test report shows what employers/recruiters receive via email after a candidate completes one of our coding tests. It includes an overall score and a detailed breakdown by specific knowledge areas, providing a clear view of a candidate's coding skills.
Reports are provided in PDF format, making them easy to read, share and print.

Custom Branding
Do you want the JavaScript coding test to match your own branding?
No problem! Use your company's domain and logo without any mention of Tests4Geeks.
Your applicants will think these programming assessment tests are all yours!

"They totally blow away the competition as far as a better product value."
Maurice H. on Capterra.com
F.A.Q.
1. Does every candidate have to answer the same questions?
Yes. JavaScript test consists of the same questions for every candidate.
In order to properly compare candidates, they need to answer questions of the same difficulty level, and different questions always mean different difficulty levels.
However, the order of questions and answers is randomized for each applicant.
2. How should I interpret the exam scores?
First of all, you need to keep in mind one very important thing:
The purpose of this JavaScript online test is not to help you find the best developers.
Its purpose is to help you avoid the worst ones.
For example, you have 5 candidates who get scores of 35, 45, 60, 65, and 80, based on a maximum possible score of 100.
We would recommend you invite the last three (those scoring 60, 65, and 80) to a live interview, not just the one who scored an 80/100.
3. Coding Test vs. Quiz
The test is presented in a multiple-choice, or quiz, format, rather than requiring test takers to write code.
If we used a coding test instead, we would have to check all answers manually, which would obviously be impossible.
4. What skill level is the test for?
The test is primarily created for mid-level developers.
5. What about junior and senior level developers?
The test can also be used to test junior programmers, but you should reduce your acceptance score drastically to compensate.
Likewise, you can use it to test senior JavaScript developers as well, with an increased acceptance score.
Some will argue that it's pointless to judge senior developers based on a test meant for mid-level developers. This is generally true if you're looking for specific skills in a candidate rather than a broad base of expertise.
But at the same time, anyone can claim to be a senior developer on their resume. If you're concerned that candidates might be overstating their knowledge and accomplishments, this JavaScript skills test is a good way to determine which ones can actually deliver what they promise.
Made by Professionals
-

T.J. Crowder
Managing Director at Farsight Software Ltd
-

Ryan O'Hara
Computer Science, University of Victoria
-

Richard O'Riordan
Senior Software Consultant