Angular Google Maps Tutorial: Demo, Examples
Angular Google Maps is a set of directives that integrate Google Maps in an AngularJS application. It makes using Google Maps in such an application very easy as you don’t need to know the Google Maps API in order to use it.
Getting Started
Let’s start with a simple example to illustrate how easy it is to display data on a map:
angular.module('appMaps', ['uiGmapgoogle-maps'])
    .controller('mainCtrl', function($scope) {
        $scope.map = { center: { latitude: 45, longitude: -73 }, zoom: 8 };
    });
This is all your controller needs in order to display a map centered on the specified location, which is defined by a latitude and a longitude. Zoom level is a value between 1 and 20, 20 being the most zoomed-in value, and 1 being the most zoomed-out.
The HTML code to display that map is fairly straightforward:
<div id="map_canvas" ng-controller="mainCtrl">
      <ui-gmap-google-map center="map.center" zoom="map.zoom"></ui-gmap-google-map>
 </div>
All of this obviously requires some dependencies: The Google Maps API, Angular JS, Angular Google Maps and Lodash, which is a dependency of Angular Google Maps. Here is what the end result looks like:
Note that some extra CSS is always needed in order to render the map appropriately. Don’t hesitate to take a look at this Plunkr to see what the end code looks like for this basic example.
Recommendation
If your company is hiring a JavaScript developer, check out this JavaScript test prepared by our professionals. It will allow you to identify the best talents very easily!
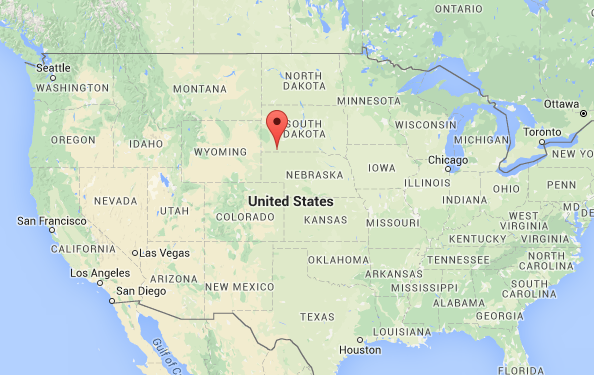
Displaying a pin
Now let’s add a pin to our map, which in the Google Maps world is called a marker:
<ui-gmap-google-map center="map.center" zoom="map.zoom" draggable="true" options="options">
        <ui-gmap-marker coords="marker.coords" options="marker.options" events="marker.events" idkey="marker.id">
        </ui-gmap-marker>
</ui-gmap-google-map>
Note that each marker requires a unique id declared in the idkey attribute for performance optimization purposes when dealing with a large amount of markers.
This code results in the following map, for which you can find the source code in this Plunker:
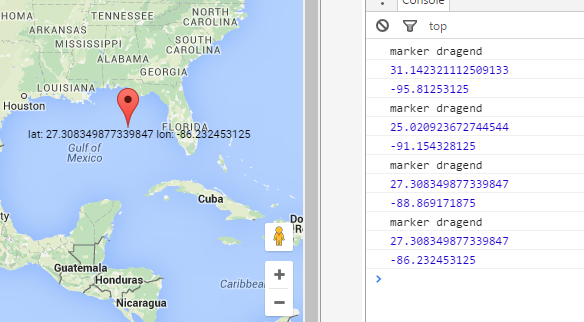
Listening to map events
Google Maps allows you to attach events to your map, your markers, and basically anything you add to your map. For instance, the above example features a “dragend” event attached to a marker. You can grab the marker and drag it around to see what the event does.
In that case, the idea was to log the coordinates of the current location of the marker using Angular JS. Here is what the dragend event handler looks like in our Angular code:
events: {
        dragend: function (marker, eventName, args) {
          $log.log('marker dragend');
          var lat = marker.getPosition().lat();
          var lon = marker.getPosition().lng();
          $log.log(lat);
          $log.log(lon);
The binding of that event happens thanks to the Angular directive attribute events="marker.events", which maps to the $scope.marker.events object defined above.
If you open the developer console of your favorite browser, you’ll see that coordinates are logged each time you stop dragging the marker:
Google Maps API implements all of the events you may need, like click or double click, mouse over, etc. This page illustrates some of those events in action.
Learn Angular? Check out this Angular + Google Maps Tutorial: Step by Step Guide and DemoClick To TweetCustomization
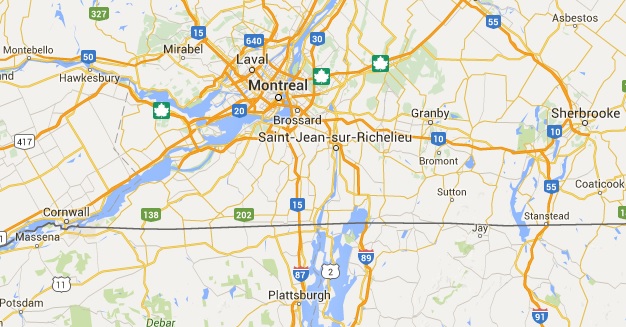
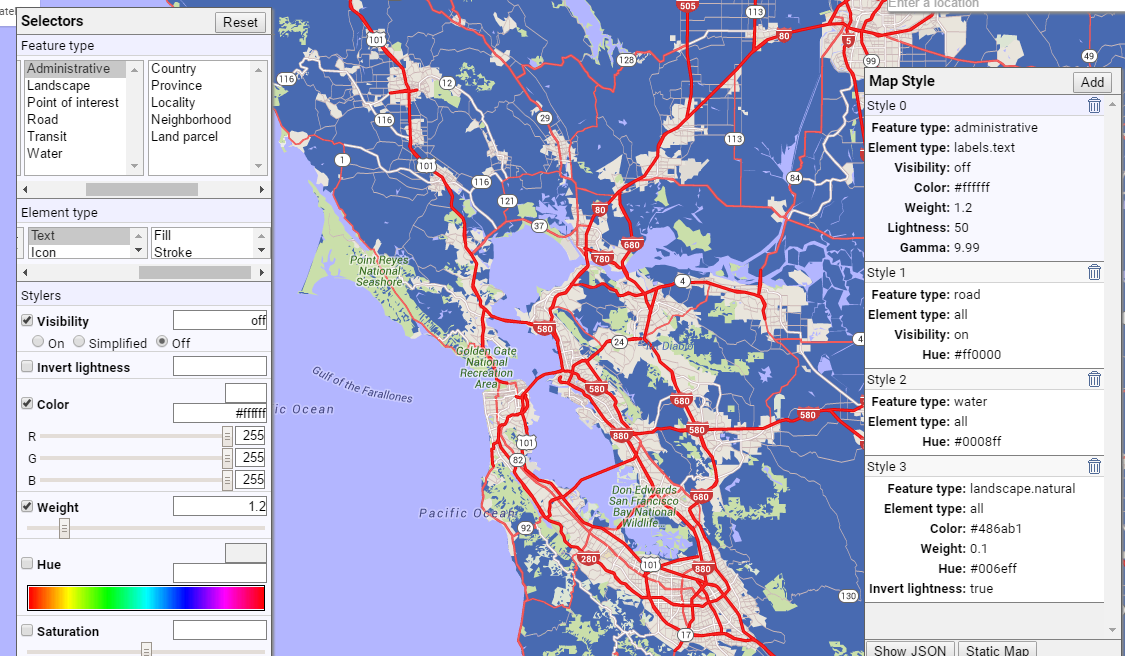
Markers and maps use their default Google Maps styling unless you specify a custom look & feel. This tool allows you to define your own style and then outputs a JSON config that you can use in your own map. I used it to create this example in less than five minutes. I changed most of the colors of the map and removed city labels:
You can also define custom marker icons or even replace the entire map tiles with your custom tile provider. Google Maps API allows you to do pretty much anything when it comes to customization. A lot of examples are provided in the Google Maps API documentation.
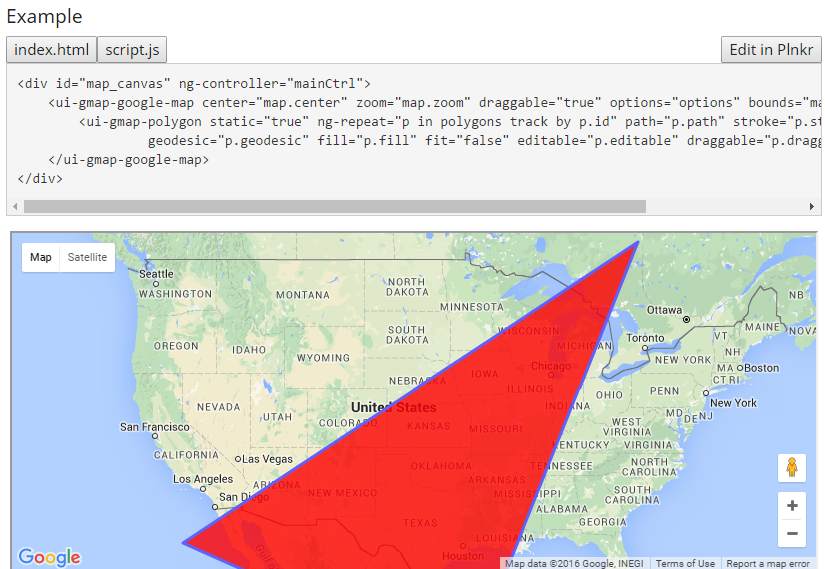
Adding custom data
In most cases you’ll want to add your own data to the map. We already saw how to add markers, but we can also add polygons, lines, heatmaps, and info windows (the pop-up windows that usually show up when clicking on a marker) to our maps.
Angular Google Maps covers all of those use cases in its API with appropriate directives.
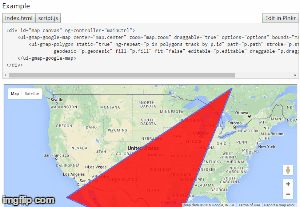
Here is a Plunker that showcases a custom polygon displayed over North America:
Conclusion
As you can see, the possibilities are almost limitless. Angular Google Maps makes it easier to render your custom JSON data with Google Maps as long as you have geocoordinates available for each of your locations. And if you just have an address, well, Google Maps API even has a geocoding service to help you get the right latitude / longitude out of it!
Learn Angular? Check out this Angular + Google Maps Tutorial: Step by Step Guide and DemoClick To TweetAlain Chautard is a published Angular JS expert and organizer of the Sacramento Angular JS meetup group in California. He shares his thoughts and current projects on his website www.alainchautard.com while running his own software consultancy at www.interstate21.com
Coding skills assessment
If you're looking to hire software engineers and want to ensure that you only interview qualified candidates, we've created coding tests that can significantly simplify your hiring process:
Hello, I am testing this app, and I notice that it doesn’t have mobile support because I can not drag in the map from an mobile. could you help me?
Hello, a very great tutorial. Thank you very much for sharing your knowledge. But while trying to use it, I found the Google Map API Key error.
Could you please tell me where to put the Google Map Api key? Thanks.